플라워로드 기술 블로그 : http://blog.flowerroad.ai
개요
이번 포스팅에서는 AWS의 API Gateway를 이용해서 WebSocket을 설정하고, Client의 처리를 해주는 Lambda의 사용법 및 Trigger설정을 살펴볼 예정입니다. 예제를 위해서 사용될 Client는 Android용 Application을 간단하게 만들어서 WebSocket동작을 살펴볼 예정입니다.
WebSocket?
WebSocket이란 OSI 7계층 중 4계층의 TCP 계층에 의존하고 HTTP 포트(80 or 443) 위에서 동작하도록 설계되었고, HTTP 프로토콜과 호환 되는 양방향 통신 방식 중 하나입니다.
기존의 일반적인 HTTP 1.x 통신방식은 client에 의해 요청을 받아서 처리하는 단방향 방식의 Server-Client통신방식인데 반해 WebSocket는 양방향 통신방식으로서 Server-Client가 연결 유지되는 상태에서 data, message들을 interaction할 수 있는 방식의 통신입니다.
WebSocket의 장잠은 기존에 할 수 없었던, client의 요청이 없더라도 Server 에서 Client로 먼저 message를 전송 할 수 있다는 점입니다. 또한 대부분의 browser가 이를 지원하고 있기 때문에 주기 때문에 실시간성이 요구되는 수 많은 web app이나 mobile app에서 solution으로 이용할 수 있게 되었습니다.
💡 이 외에도 요즘은 HTTP/2 혹은 HTTP/2 base의 gRPC등 여러 연결 유지 방식이 있기 때문에 Project성격 이나 환경에 맞게 선택할 수 있습니다.
API Gateway 설정
💡 AWS Console을 이용해서 API Gateway를 설정하기 전에 WebSocket의 Event를 처리해줄 Lambda를 먼저 준비해주세요. connect, disconnect, default 세개의 event를 처리할 예정이므로 최하 하나이상의 Lambda function 을 배포한 상태에서 진행하시면 됩니다.

AWS Console의 API Gateway 항목에서 "Create API" 버튼을 누릅니다.
이후 아래와 같이 여러 type의 API가 있는데 오늘은 주제에 맞게 "WebSocket API"를 선택합니다.

이후 API의 name과 Lambda에서 유입되는 데이터의 action type을 구분하는 template를 기록합니다.

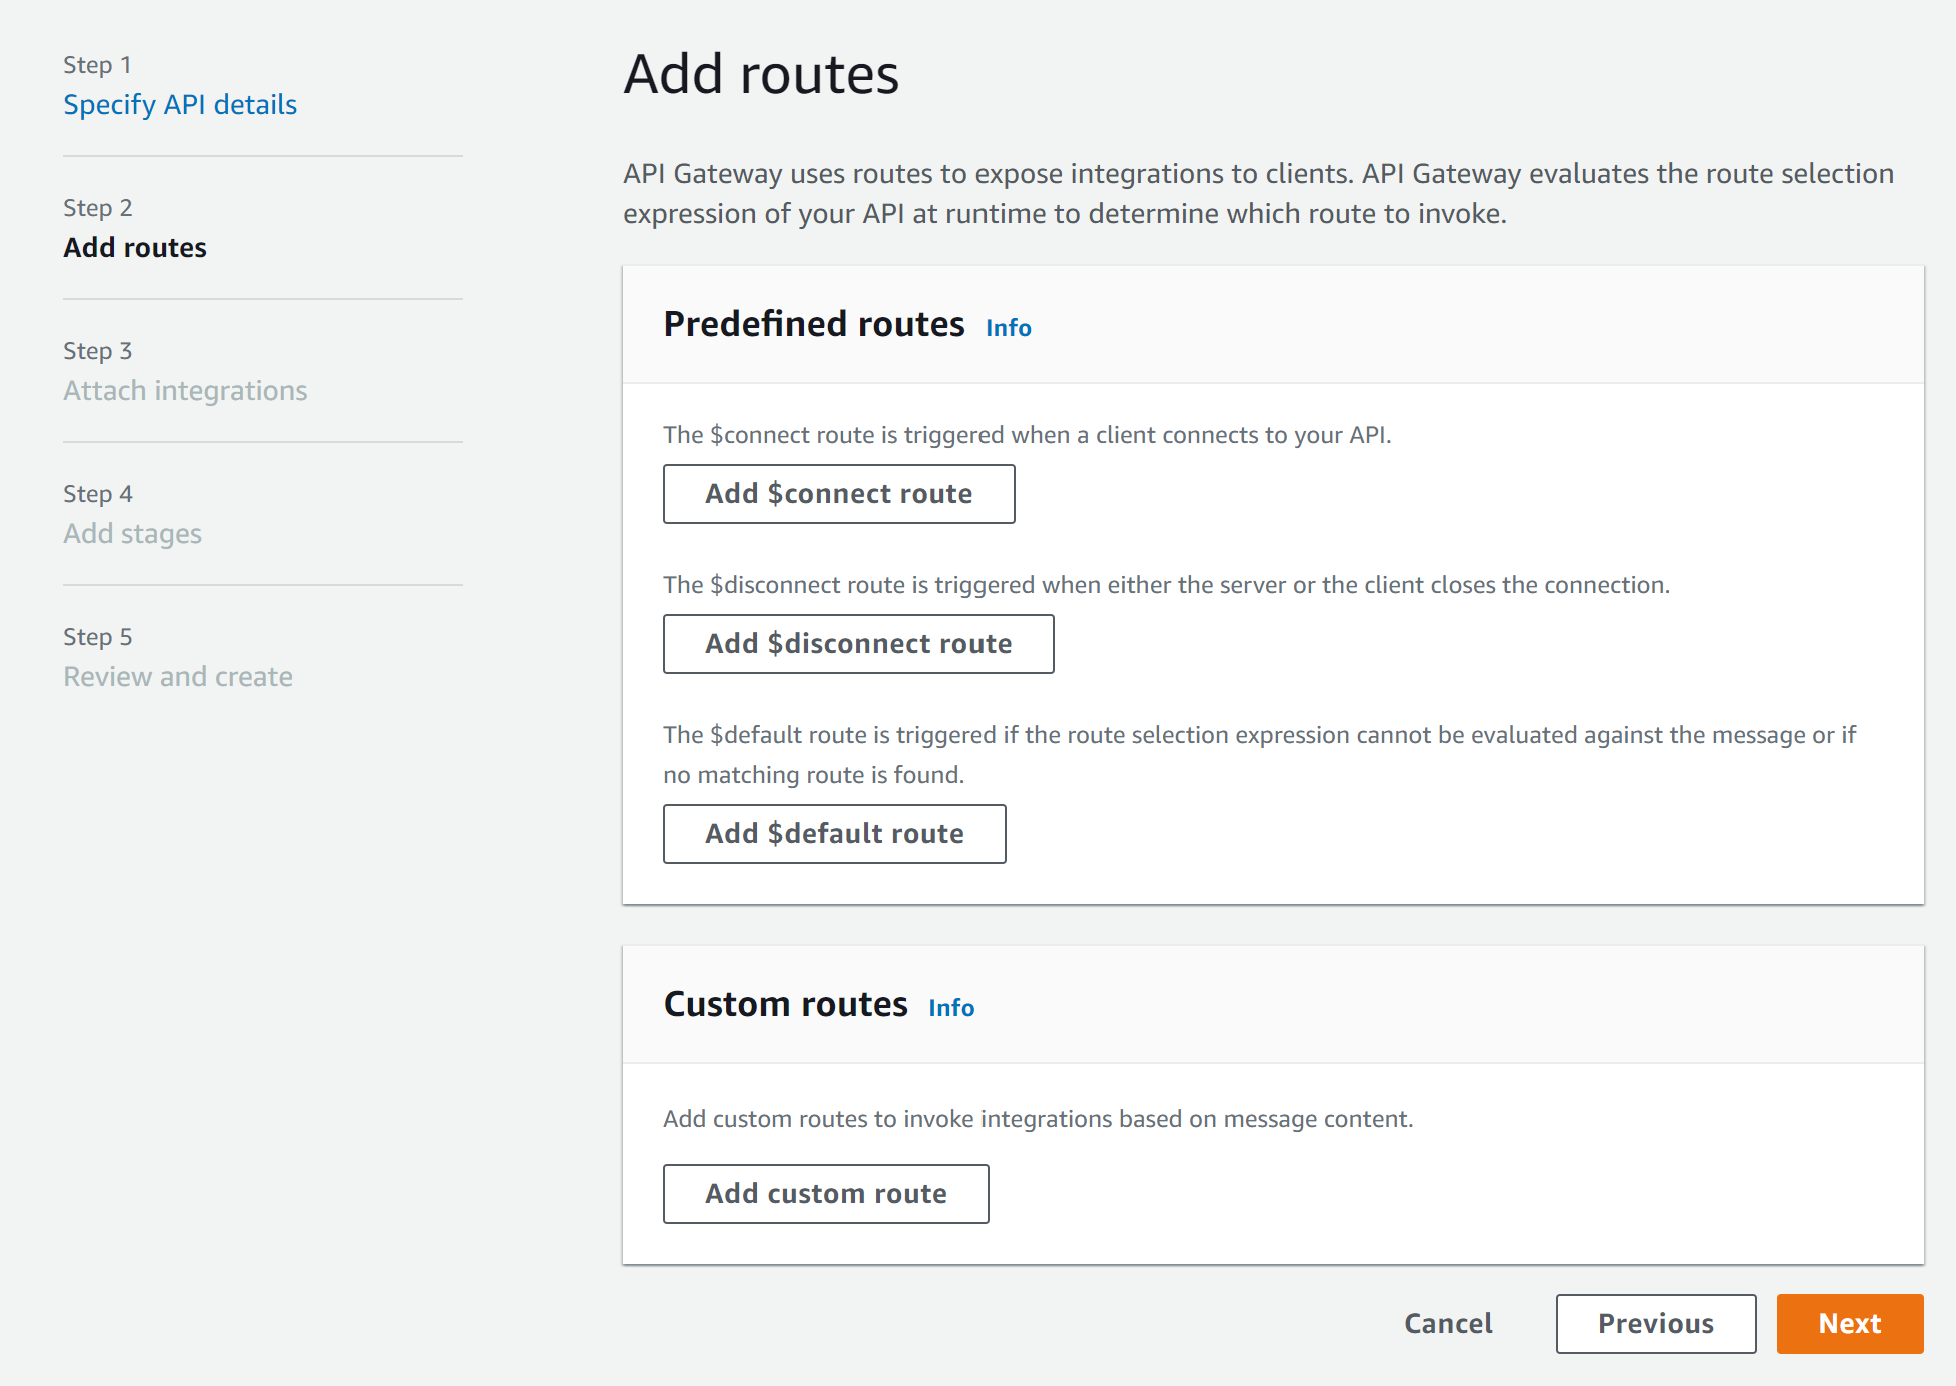
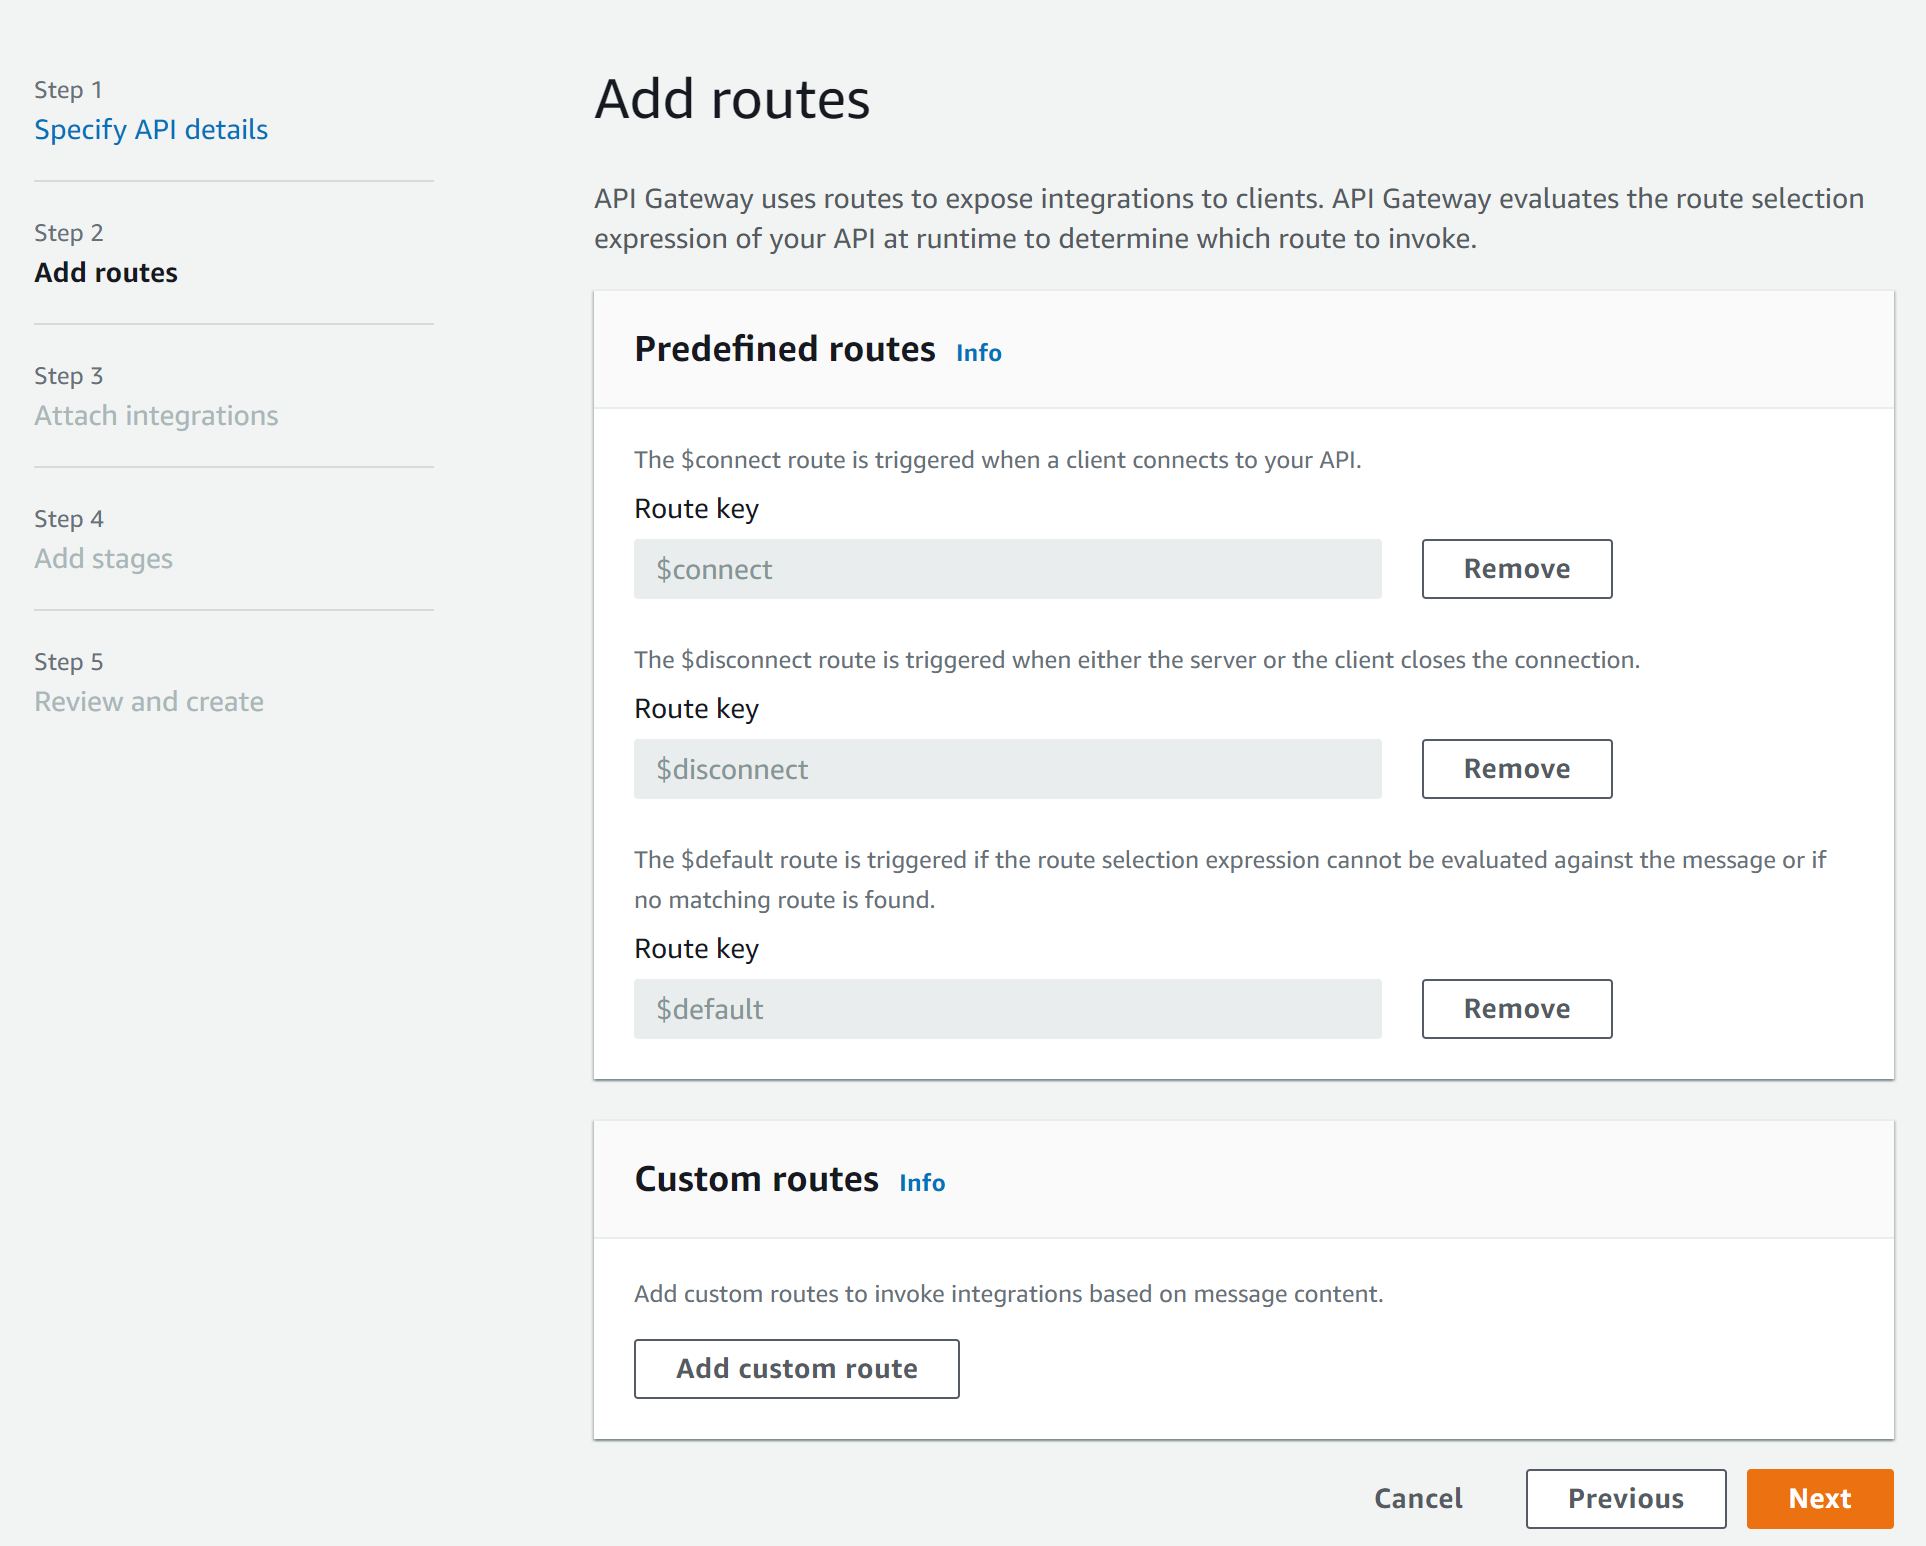
다음은 route할 event를 설정합니다. 여기서는 connect, disconnect, default 기본적인 세 event만 등록할 예정입니다. 만약 개발하는 환경에 맞는 여러 route가 필요하다면 custom routes 항목에 추가 해주시면 됩니다.
다음 화면에서는 먼저 설정한 event들이 발생했을때 처리할 method를 설정합니다. 여기에서는 event의 처리를 Lambda에서 할 예정이므로 그림과 같이 Lambda를 선택하고 각각의 event를 처리할 Lambda를 선택합니다. 저는 세개의 Lambda Function들을 이용해서 각 event마다 dedicated 되어 있는 Lambda를 따로 설정했습니다.

그리고, 배치할 API Gateway의 stage를 설정하고(여기서는 admin"으로 하겠습니다.)

최종 내용을 확인 한 후 "Create and deploy" 버튼을 이용해서 생성하면 됩니다.

이후 생성된 API Gateway를 클릭하면 아래와 같은 내용을 확인 할 수 있습니다.

네! 그렇습니다. 사실 배포는 이게 끝입니다. 기존에 event를 처리할 Lambda Function을 미리 만들어서 연결을 했기 때문에 이제 유입되는 connect, disconnect, default message 에 대해서 연결된 Lambda가 정상적으로 Invoke되는지와 Log message를 이용해서 event data가 어떻게 구성되었는지 살펴볼 것 입니다.
serverless Framework이용한 배포
API Gateway의 설정을 위해서 AWS Console를 이용하거나 AWS CLi을 이용해서 직접 설정할 수도 있으나 Lambda의 배치, event연결 등의 편의를 위해서 serverless framework을 이용하는 방법을 보여드릴 예정입니다.
💡 serverless Framework은 AWS의 특히 API gateway, Lambda의 배치를 쉽게 해주는 일종의 tool로서 실제 service환경에서 수많은 lambda를 일일이 console나 AWS CLi를 이용해서 배치하기에는 무리가 있기 때문에 이런 Framework, tool을 이용하고는 합니다. 이 외에도 Terraform등 여러 배포, 설정 자동화 Framework, tool이 있으나 필자는 serverless Framework + Terraform을 이용하고 있습니다.
WebSocket 은 기본적으로 connect, disconnect, default 세가지 event를 생성 할 수 있고, 이는 각각의 Lambda와 연결해서 해당 event가 발생할때 연결된 Lambda를 invoke할 수 있도록 설정 할 수 있습니다.
아래와 같이 serverless.yml의 functions부분을 작성해서 세 종류의 event와 각각의 lambda에 연결해서 배치 할 수 있습니다.
functions:
  connect:
    handler: ws_handlers/action.connect
    name: ws-connect
    events:
      - websocket:
          route: $connect

  disconnect:
    handler: ws_handlers/action.disconnect
    name: ws-disconnect
    events:
      - websocket:
          route: $disconnect

  default:
    handler: ws_handlers/action.default
    name: ws-default
    events:
      - websocket:
          route: $default
위와 같이 serverless.yml의 내용을 추가하고 sls deploy 를 이용해서 API Gateway + Lambda를 배포 하실 수 있습니다.
Lambda Handler 예제
우선 connect와 disconnect를 처리할 lambda function으로 ws_handlers/action.js 파일에 아래와 같이 추가한다.
module.exports.connect = async (event, context, callback)=>{
    log.info('connect invoked : ', JSON.stringify(event));

    try{
        return callback(null, {
            statusCode: 200,
            body: JSON.stringify("test")
        });
    }catch(e){
        return callback(null, {
            statusCode: 400,
        });
    }
};

module.exports.disconnect = async (event, context, callback)=>{
    log.info('disconnect invoked : ', JSON.stringify(event));

    try{

        return callback(null, {
            statusCode: 200,
            body: JSON.stringify("test")
        });
    }catch(e){
        return callback(null, {
            statusCode: 400,
        });
    }
};
이후 client로 부터 전송되는 data를 그대로 echo message로 보내주기 위해서 아래와 같이 default event를 처리할 코드도 ws_handlers/action.js 에 추가한다.
module.exports.default = async (event, context, callback)=>{
    log.info('default invoked : ', JSON.stringify(event));

    try{
        const api = new aws.ApiGatewayManagementApi({
            endpoint: event.requestContext.domainName + "/" + event.requestContext.stage,
        });
        api.postToConnection({
          ConnectionId: event.requestContext.connectionId,
          Data: event.body,
        })
        .promise();
        return callback(null, {
            statusCode: 200,
            body: JSON.stringify("OK")
        });
    }catch(e){
        return callback(null, {
            statusCode: 400,
        });
    }
};
위와같이 코드를 작성한 후 Lambda에 적용하고 test app을 이용해서 접속 및 데이터를 전송하면 아래와 같이 connect, disconnect, default에 대한 log message를 CloudWatch에서 확인할 수 있다. (예시는 connect의 log)

connect
데이터 송수신을 위한 Client 구분
client의 연결 및 데이터 송수신은 Lambda를 이용해서 구현 할 수 있습니다. 이때 특정 client에게만 데이터를 보내기 위해서는 해당 client를 구분 할 수 있는 ID가 필요합니다. 이를 위해서 사용할 수 있는 것이 connectionId입니다.
Lambda의 event parameter를 log로 보면 아래와 같은 JSON형식의 데이터를 볼 수 있습니다.
event에는 "routeKey"나 event Type, time, API Gateway의 state등의 기본적인 데이터를 확인할 수 있고, 이중 Client를 구분하기 위해서 사용되는 데이터는 connectionId 를 볼수 있습니다.
이 connectionId는 접속되어 있는 각각의 client를 구분하고, 특정 client에게만 데이터를 전송할때에 사용할 수 있는 매우 중요한 unique ID입니다.
일반적으로 처음 connect event가 발생 했을때 데이터의 connectionId를 특정 영역에 저장해두고(redis, db 등) 연결된 client들을 관리할 수 있습니다. 또한 disconnect event가 발생했을때 connectionId를 삭제하고, 연결 종료 처리를 할때에도 사용됩니다.
이 외에도 해당 connectionId를 이용해서 전통적인 서버에서의 client관리, 메세지 전달등의 동작을 할 수 있습니다.(전통 서버의 session ID와 유사한기능)
{
    "requestContext": {
        "routeKey": "$default",
        "disconnectStatusCode": null,
        "messageId": "YgJAkfklIE3CIcQ=",
        "eventType": "MESSAGE",
        "extendedRequestId": "YgJZkEKVoE0Fnxg=",
        "requestTime": "20/Mar/2021:03:58:40 +0000",
        "messageDirection": "IN",
        "disconnectReason": null,
        "stage": "admin",
        "connectedAt": 1609559919931,
        "requestTimeEpoch": 1609559920356,
        "identity": {
            "cognitoIdentityPoolId": null,
            "cognitoIdentityId": null,
            "principalOrgId": null,
            "cognitoAuthenticationType": null,
            "userArn": null,
            "userAgent": null,
            "accountId": null,
            "caller": null,
            "sourceIp": "125.130.48.103",
            "accessKey": null,
            "cognitoAuthenticationProvider": null,
            "user": null
        },
        "requestId": "YgJZkwKVaE0Fnxg=",
        "domainName": "111111111111111.execute-api.ap-northeast-2.amazonaws.com",
        **"connectionId": "YxJZtujoIE0CIcQ="**,
        "apiId": "1i2dt39y2p5"
    },
    "body": "Request Scooter List",
    "isBase64Encoded": false
}
부록 - Android Test Client 예제 코드
아래 코드는 제가 테스트를 위해서 구현한 android WebSocket 부분의 코드입니다.
간단한 내용이기 때문에 여기서는 설명하지 않겠습니다.
public interface SocketManager {
    URI getURI();

    SocketManager setURI(String uri) throws URISyntaxException;

    SocketManager.Listener getListener();

    SocketManager setListener(SocketManager.Listener listener);

    SocketManager initSocket();

    WebSocketClient getSocket();

    boolean isConnected();

    boolean connect();

    boolean send(String data);

    boolean send(byte[] data);

    void close();

    interface Listener {
        void onConnect();

        void onMessage(String message);

        void onMessage(byte[] data);

        void onDisconnect(int code, String reason);

        void onError(Exception error);
    }
}
public class WebSocketManager implements SocketManager {
    private static final String TAG = "WebSocketManager";
    private URI mURI = null;
    private WebSocketClient mSocket = null;
    private SocketManager.Listener mListener;
    private boolean connectionStatus = false;

    public WebSocketManager() {
    }

    /*************************************************************************
     * Private Method
     *************************************************************************/
    private String byteArrayToHex(byte[] a) {
        StringBuilder sb = new StringBuilder();
        for (final byte b : a)
            sb.append(String.format("%02x ", b & 0xff));
        return sb.toString();
    }

    private void setConnectionStatus(boolean status) {
        this.connectionStatus = status;
    }

    private void checkConnection() throws Exception {
        if (!this.isConnected()) {
            Log.d(TAG, "checkConnection: Is not connected");
            throw new Exception("Exception : Is not connected");
        }
    }

    public URI getURI() {
        return this.mURI;
    }

    /*************************************************************************
     * public Method
     *************************************************************************/
    public WebSocketManager setURI(String uri) {
        try {
            this.mURI = new URI(uri);
            Log.d(TAG, "setURI: " + this.mURI);
        } catch (Exception e) {
            e.printStackTrace();
            this.mURI = null;
        }
        return this;
    }

    public SocketManager.Listener getListener() {
        return this.mListener;
    }

    public WebSocketManager setListener(SocketManager.Listener listener) {
        this.mListener = listener;
        return this;
    }

    public boolean isConnected() {
        return this.connectionStatus;
    }

    public WebSocketClient getSocket() {
        return this.mSocket;
    }

    public WebSocketManager initSocket() {
        try {
            WebSocketManager self = this;
            this.mSocket = new WebSocketClient(this.getURI()) {
                @Override
                public void onOpen(ServerHandshake handshake) {
                    Log.d(TAG, "onOpen: " + handshake);
                    self.mListener.onConnect();
                    self.setConnectionStatus(true);
                }

                @Override
                public void onMessage(String message) {
                    try {
                        Log.d(TAG, "onMessage: Received > " + message);
                        self.mListener.onMessage(message);
                    } catch (Exception ex) {
                        ex.printStackTrace();
                    }
                }

                @Override
                public void onMessage(ByteBuffer bytes) {
                    try {
                        Log.d(TAG, String.format("Got binary message! %s", self.byteArrayToHex(bytes.array())));
                        self.mListener.onMessage(bytes.array());
                    } catch (Exception ex) {
                        ex.printStackTrace();
                    }
                }

                @Override
                public void onClose(int code, String reason, boolean remote) {
                    try {
                        Log.d(TAG, "onClose: IN >>");
                        self.mListener.onDisconnect(code, reason);
                    } catch (Exception ex) {
                        ex.printStackTrace();
                        self.mListener.onDisconnect(-1, "exception");
                    }
                }

                @Override
                public void onError(Exception ex) {
                    Log.d(TAG, "onError: IN >>");
                    ex.printStackTrace();
                    self.mListener.onError(ex);
                }
            };
            return this;
        } catch (Exception ex) {
            ex.printStackTrace();
            throw ex;
        }
    }

    public boolean connect() {
        try {
            Log.d(TAG, "connect: IN >>");
            this.mSocket.connect();
            this.setConnectionStatus(true);
            return true;
        } catch (Exception ex) {
            ex.printStackTrace();
            return false;
        }
    }

    public boolean send(String data) {
        try {
            Log.d(TAG, "send(String): IN >>");
            this.checkConnection();
            this.mSocket.send(data);
            return true;
        } catch (Exception ex) {
            ex.printStackTrace();
            return false;
        }
    }

    public boolean send(byte[] data) {
        try {
            Log.d(TAG, "send(byte[]): IN >>");
            this.checkConnection();
            this.mSocket.send(data);
            return true;
        } catch (Exception ex) {
            ex.printStackTrace();
            return false;
        }
    }

    public void close() {
        try {
            Log.d(TAG, "close: IN >>");
            this.mSocket.close();
            this.setConnectionStatus(false);
        } catch (Exception ex) {
            ex.printStackTrace();
        }
    }
}
참고
'개발 > backend' 카테고리의 다른 글
| [Backend] 쿠버네티스(K8S)를 시작해보자(1) - 이론편 (0) | 2022.03.06 |
|---|---|
| [AWS] AWS RDS - MySQL vs Aurora (0) | 2022.02.27 |
| [Backend] 공유 스쿠터 서비스 - 플라워로드 시스템 아키텍처 : AWS Architecture (0) | 2022.02.24 |
| [Backend] 공유 스쿠터 서비스 - 플라워로드 시스템 아키텍처 사용 기술들 (0) | 2022.02.23 |
| [Backend] 공유 스쿠터 서비스 - 플라워로드 시스템 아키텍쳐 데이터 FloW (0) | 2022.02.23 |